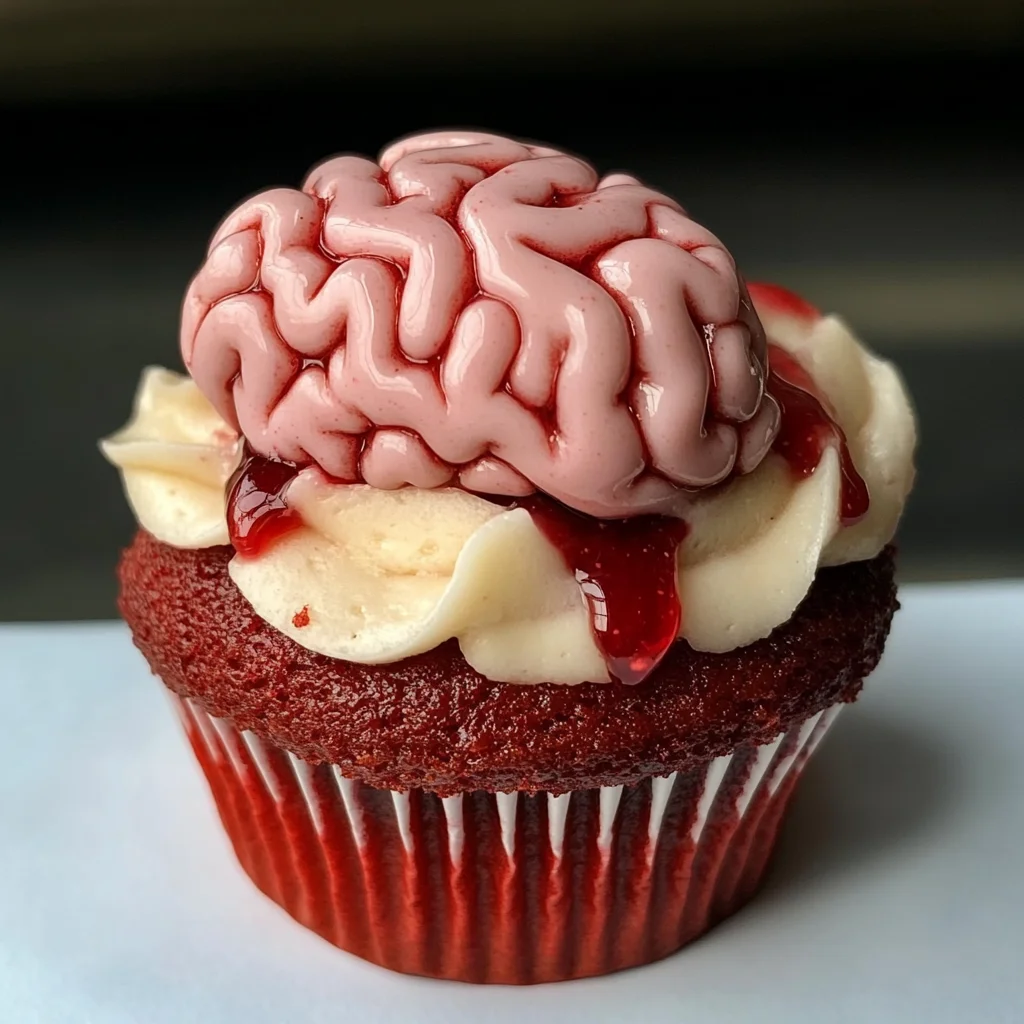
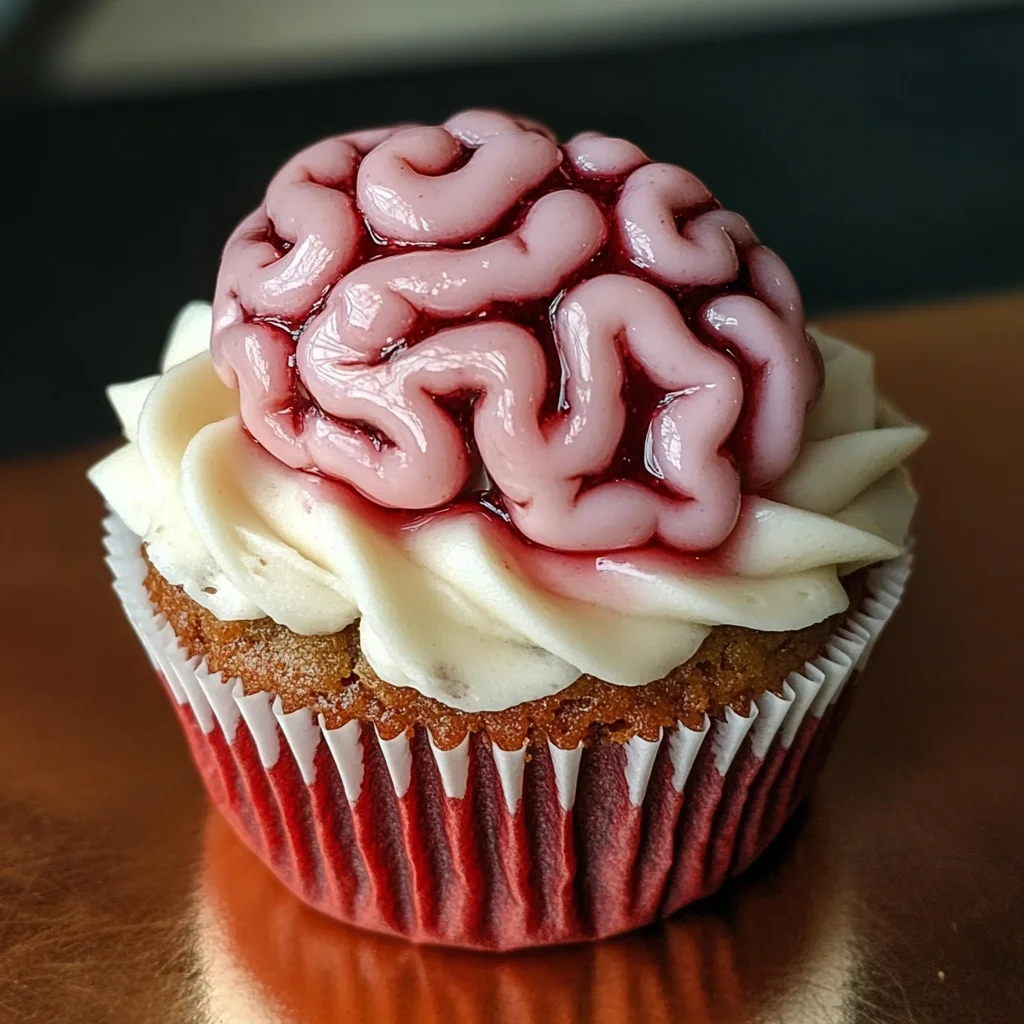
Bleeding Brain Cupcakes
Bleeding Brain Cupcakes are the perfect treat for Halloween, combining a rich red velvet flavor with a spooky twist. These fun cupcakes are not only visually striking but also incredibly delicious, making them ideal for parties, celebrations, or just a fun baking project with friends or family. The jam filling adds a delightful surprise, while the brain-themed icing takes these treats to the next level of creativity.
Why You’ll Love This Recipe
- Easy to Make: These cupcakes use simple ingredients and straightforward steps, making them approachable for all skill levels.
- Delicious Flavor: The combination of red velvet cake and sweet jam creates a delightful taste that everyone will love.
- Perfect for Halloween: With their spooky brain decoration, these cupcakes are an eye-catching addition to any Halloween gathering.
- Versatile Treats: While great for Halloween, they can be enjoyed at birthday parties or themed events year-round.
- Fun for All Ages: Baking and decorating these cupcakes is a fun activity for kids and adults alike!
Tools and Preparation
Before diving into creating your Bleeding Brain Cupcakes, it’s helpful to gather the right tools. Using the appropriate equipment ensures your baking process goes smoothly and yields tasty results.
Essential Tools and Equipment
- Electric mixer
- Cupcake tin
- Black cupcake cases
- Mixing bowls
- Piping bag with nozzle
- Cupcake corer or knife
Importance of Each Tool
- Electric mixer: Helps achieve a fluffy batter quickly and easily without much effort.
- Cupcake tin: Ensures even baking of your cupcakes in uniform shapes.
- Piping bag: Allows for precise decorating of the buttercream icing for that perfect brain effect.
Ingredients
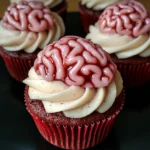
Red velvet cupcake, filled with jam, topped with brain themed pink icing – perfect for Halloween!
Ingredients:
– 150 g Butter or baking spread (softened, unsalted)
– 150 g Caster sugar
– 2 Eggs (large)
– 1 tsp Vanilla extract
– 85 ml Buttermilk
– 165 g Self raising flour
– 1 1/2 tbsp Cocoa powder
– 1/2 tsp Bicarbonate of soda
– 1 tsp Red food colouring (I use Pro Gel or Sugarflair)
– 200 g Strawberry or Raspberry Jam
– 200 g Butter (unsalted, softened)
– 400 g Icing sugar
– 1 tsp Vanilla extract
– 2 tbsp Milk
– Pink food colouring (I use Pro Gel or Sugarflair)
How to Make Bleeding Brain Cupcakes
Step 1: Preheat the Oven
Preheat your oven to 160C Fan/180C/350F/Gas Mark 4. Line a cupcake tin with black cupcake cases to give them an extra spooky flair.
Step 2: Prepare the Batter
Whisk together the softened butter and caster sugar in a mixing bowl until fluffy. It’s best to use an electric mixer with a paddle attachment for this step.
Step 3: Incorporate Eggs and Vanilla
Add the eggs and vanilla extract to the mixture. Mix until well combined.
Step 4: Add Remaining Ingredients
Combine buttermilk, cocoa powder, bicarbonate of soda, red food coloring, and self-raising flour into the bowl. Mix until you achieve a smooth batter.
Step 5: Fill the Cases
Divide your batter evenly between the lined cupcake cases.
Step 6: Bake
Place in the preheated oven and bake for about 20–25 minutes or until a skewer inserted in the center comes out clean. Once baked, transfer them to a cooling rack.
Step 7: Create Filling Holes
Once cooled completely, take your cupcake corer or knife and create holes in the center of each cupcake.
Step 8: Fill with Jam
Fill each hole with your choice of strawberry or raspberry jam using either a small spoon or piping bag.
Step 9: Make Buttercream Icing
In another bowl, mix softened unsalted butter on its own until creamy. This is best done using an electric mixer as well.
Step 10: Combine Icing Ingredients
Add icing sugar, milk, vanilla extract, and a small amount of pink food coloring. Mix until smooth—remember to keep it pale pink!
Step 11: Decorate Your Cupcakes
Scoop your buttercream into a piping bag fitted with a circular nozzle. Pipe down the center of each cupcake then create squiggles on either side for that signature brain look.
Step 12: Store Properly
Keep your beautiful Bleeding Brain Cupcakes in an airtight container in a cool place. Enjoy leftovers within three days!
How to Serve Bleeding Brain Cupcakes
Serving Bleeding Brain Cupcakes can enhance their spooky appeal, especially for Halloween gatherings or themed parties. Consider these fun and creative serving suggestions to impress your guests.
Creative Presentation Ideas
- Spooky Platter: Arrange the cupcakes on a black platter surrounded by fake spider webs and plastic spiders for a creepy effect.
- Cupcake Stand: Use a tiered cupcake stand to display the cupcakes, making them the centerpiece of your dessert table.
- Themed Liners: Opt for Halloween-themed cupcake liners featuring ghosts or pumpkins to add an extra touch.
Fun Accompaniments
- Gummy Worms: Place gummy worms on top of the cupcakes or around the platter for a playful touch.
- Chocolate Sprinkles: Sprinkle some chocolate sprinkles over the icing to resemble dirt, enhancing the Halloween look.
- Creative Labels: Use small flags or labels with spooky names for each cupcake flavor, adding an interactive element.
How to Perfect Bleeding Brain Cupcakes
To make sure your Bleeding Brain Cupcakes turn out perfectly, consider these helpful tips that will elevate your baking game.
- Bold Butter Whipping: Whip the butter until it’s light and fluffy. This creates a smoother texture in your cupcakes.
- Precise Measurement: Use a kitchen scale to measure ingredients accurately. This ensures consistent results every time you bake.
- Cool Completely: Allow cupcakes to cool completely before filling them with jam. This prevents melting and keeps the structure intact.
- Gentle Mixing: Mix ingredients gently once combined. Overmixing can lead to dense cupcakes instead of light and fluffy ones.
- Taste Test Frosting: Always taste your buttercream before piping. Adjust sweetness or color as needed for the best flavor and visual appeal.
Best Side Dishes for Bleeding Brain Cupcakes
Pairing side dishes with Bleeding Brain Cupcakes can create a delightful spread for any event. Here are some excellent options to complement your spooky dessert:
- Pumpkin Soup: A warm pumpkin soup adds seasonal flavor and pairs well with sweet desserts.
- Stuffed Peppers: Colorful stuffed peppers can provide a savory contrast to the sweetness of the cupcakes.
- Vegetable Skewers: Skewers with assorted vegetables offer a fresh, crunchy side that balances out rich flavors.
- Cheese Platter: A selection of cheeses can please different palates, making it an excellent addition to your table.
- Spooky Cheese Balls: Shape cheese balls into ghost figures using herbs and spices for an entertaining appetizer.
- Fruit Salad: A refreshing fruit salad with seasonal fruits adds color and lightness to your dessert spread.
- Savory Mini Quiches: Mini quiches filled with vegetables or chicken bring richness without overpowering the sweet cupcakes.
- Garlic Breadsticks: Crispy garlic breadsticks offer an irresistible savory option that guests will love alongside sweets.
Common Mistakes to Avoid
When making Bleeding Brain Cupcakes, it’s easy to overlook some key steps. Here are common mistakes and how to avoid them:
- Boldly Underestimating Cooling Time: Not allowing the cupcakes to cool completely can cause the jam to melt and leak out. Ensure they are fully cooled before filling.
- Boldly Overfilling with Jam: Adding too much jam can make your cupcakes soggy. Fill each cupcake hole with just enough jam to provide a sweet surprise without overflow.
- Boldly Skipping the Piping Bag: Using a knife instead of a piping bag for the icing can lead to uneven designs. A piping bag creates a more appealing brain effect.
- Boldly Ignoring Butter Temperature: Using cold butter for the icing will lead to clumps and an uneven texture. Make sure your butter is softened for smooth mixing.
- Boldly Overmixing the Batter: Mixing too much can create dense cupcakes. Mix just until combined for a light and fluffy texture.
Storage & Reheating Instructions
Refrigerator Storage
- Store Bleeding Brain Cupcakes in an airtight container.
- They will stay fresh for up to 3 days in the fridge.
Freezing Bleeding Brain Cupcakes
- Place the cupcakes in a freezer-safe container or wrap them tightly in plastic wrap.
- They can be frozen for up to 2 months; thaw before serving.
Reheating Bleeding Brain Cupcakes
- Boldly Oven: Preheat your oven to 150°C (300°F) and warm the cupcakes for about 10 minutes.
- Boldly Microwave: Heat on medium power in 10-second intervals until warm, being careful not to overheat.
- Boldly Stovetop: Place a pan on low heat, cover with a lid, and warm the cupcakes gently for about 5 minutes.
Frequently Asked Questions
Here are answers to some common queries about Bleeding Brain Cupcakes.
What is the best way to achieve a bright red color?
To achieve vibrant red coloring, use gel food coloring as it provides more intensity than liquid dyes.
Can I substitute ingredients in Bleeding Brain Cupcakes?
Yes! You can use dairy-free butter and plant-based milk if you prefer a vegan version while keeping the recipe delicious.
How do I prevent my cupcakes from overflowing?
Ensure you fill each cupcake case only two-thirds full with batter. This allows room for rising without overflow.
How long do these cupcakes last?
Bleeding Brain Cupcakes are best enjoyed within three days when stored properly in an airtight container at room temperature.
Final Thoughts
Bleeding Brain Cupcakes are a fun and spooky treat perfect for Halloween or any themed party. Their rich flavor combined with the unique presentation makes them stand out. Feel free to customize your decorations or experiment with different fillings like other fruit jams!
Bleeding Brain Cupcakes
Bleeding Brain Cupcakes are a delightful Halloween treat that combines rich red velvet flavor with a spooky twist. These visually striking cupcakes are filled with luscious jam and topped with whimsical brain-themed icing, making them the perfect addition to any Halloween gathering or themed party. Easy to make and fun for all ages, these treats are sure to impress your guests while satisfying their sweet tooth. Whether you’re hosting a spooky soirée or looking for a creative baking project, these cupcakes will be a hit.
- Prep Time: 20 minutes
- Cook Time: 25 minutes
- Total Time: 45 minutes
- Yield: Makes approximately 12 cupcakes 1x
- Category: Dessert
- Method: Baking
- Cuisine: American
Ingredients
- 150 g softened unsalted butter
- 150 g caster sugar
- 2 large eggs
- 1 tsp vanilla extract
- 85 ml buttermilk
- 165 g self-raising flour
- 1.5 tbsp cocoa powder
- 0.5 tsp bicarbonate of soda
- 1 tsp red food coloring
- 200 g strawberry or raspberry jam
- 200 g unsalted butter (for icing)
- 400 g icing sugar
- 1 tsp vanilla extract (for icing)
- 2 tbsp milk
- Pink food coloring
Instructions
- Preheat oven to 160C fan/180C/350F. Line a cupcake tin with black cases.
- In a mixing bowl, whisk the softened butter and caster sugar until fluffy using an electric mixer.
- Add eggs and vanilla extract; mix until combined.
- Incorporate buttermilk, cocoa powder, bicarbonate of soda, red food coloring, and self-raising flour. Mix until smooth.
- Divide batter evenly among lined cases and bake for 20–25 minutes or until a skewer comes out clean.
- Cool completely before coring the center of each cupcake and filling with jam.
- For icing, beat softened butter until creamy, then mix in icing sugar, milk, vanilla extract, and pink food coloring until smooth.
- Pipe the icing onto cupcakes in a brain-like design.
Nutrition
- Serving Size: 1 cupcake (70g)
- Calories: 380
- Sugar: 35g
- Sodium: 120mg
- Fat: 18g
- Saturated Fat: 10g
- Unsaturated Fat: 8g
- Trans Fat: 0g
- Carbohydrates: 52g
- Fiber: 1g
- Protein: 4g
- Cholesterol: 50mg